Showing posts with label kegs. Show all posts

Thursday, May 17, 2012

The Øl Rig

Dear beer lover,

I know you have been neglected lately with minimal feedback on the status of my semi-automated, all-grain, stainless-steel, digital thermo-regulated brewing system, but hopefully this blog post will make up for it. It is not for lack of wanting to share my progress with you (far from it as my colleagues and friends will vouch) but mostly due to a little hectic schedule lately.

I had in my mind that sometime towards the end of Q1 2012 I would be up and running with my brew system, and as we approached and past that date I decided to lock in a date for the first brew. It was May 6th - my birthday. It wasn't as though I had lost the passion for building the system over that time ... but I really enjoyed just doing a little bit each week and was really quite loving the journey and seeing slow but beautiful progress. Now that I have arrived at the destination, it is just as good as I had imagined and I can already see lots of small little tweaks to keep improving it ... so the journey will continue along for quite some pleasant time!

I must admit, the last 2 weeks before my birthday were busy with many small tasks needing to be finished (flaring and silver soldering fittings, bending tubing, welding some washers on to secure the kegs, etc etc. I still have a few additional tasks that I should do, such as mounting some wind-guards for the burners and tap in my brew system name plaque, but it is perfectly functional as it is.

So the system ... here it is. It was named "The Øl Rig" by Emma and I. Øl means beer in Norwegian, which is close sounding to "Oil" and then "Rig" as in "oil rig" which is very close to home with Stavanger being the capital of oil in Norway and also because in some weird way the brew system has some similarities to an oil platform. Emma kindly made up a plaque with "The Øl Rig" on it in stainless and went to the trouble of measuring it up to make sure it would fit on the frame or on the control panel. She gave it to me on my birthday. Good on ya em! Here it is on my control panel. I plan to put it on the frame some stage soon.

Here is a shot of the full system. For the photo, I just connected up some of the silicon tubing to give an idea of how the fluid gets transferred between the various keggles. The HLT (hot liquor tank) is on the right which heats up the water to the various inclusion temperatures. The MLT (mash and lautering tun) is in the middle and holds the crushed grain and recirculates to convert and extract the sugars from the malted barley. The BK (boil kettle) is on the left which boils the wort and takes the various additions of hops in addition to recirculating through the plate chiller for when I need to cool down the boiled wort to fermentation temperatures. I made lids for the kettles out of the old lids and welded on some handles from the original dip tubes. Nothing gone to waste.

Here is the control panel. I used illuminated switches which required a bit of wiring to utilize the illuminating function but add a bit of bling to the system. The STC-1000 temperature controllers which can be set to whatever temperature you want and then they open and close the gas solenoids to fire the burners when needed. I also added in some three way switches which allow a bit more flexibility and prevent the solenoids from opening if I don't want them open as well as allows me to open them without the temperature control as well. And some illuminated switches which control the two 809 March pumps for recirculating the fluids.

Here is a pic of the in-line Tee temperature thermistors. This allows me to recirculate the fluid and get inline and accurate control of the temperature. The Tees can be disconnected and used elsewhere (such as on the plate chiller or boil kettle) if required. Also I have my dial thermometers for secondary and additional temperature measurement as well as the valves and some sight glasses which give me knowledge of how much fluid I have transferred, boiled off, etc.

This is a pic of the big 20-tip jet burner. I hand carried these back from oz but it was worth it. These are beasts and pump out a lot of heat. I included a pilot light as well as a thermocouple pilot safety system to prevent release of gas if the pilot goes out. I put them on adjustable height shelves which has allowed me to change the distance between flame tip and bottom of the keggles (I was about 45mm too low to start with when I brewed on my birthday).

This shows the gas beam at the back of the system which holds gas under pressure (only 0.5 psi) and distributes it to the 3 burners. I have a ball valve for closing the system, then the gas pilot safety valve, then the solenoid and then the yellow flexible stainless tubing to distribute the gas to the burners.
Here is a front shot of the pumps. I bent some diamond plate over them to protect the pump motors ... plus it looks cool! Stainless valves on the pumps as well as camlocks for the tubing.

Here is the plate chiller. I looked at quite a few of these but this was the best by far in terms of value and performance. It is from duda diesel in the US and is amazing. Cooling water (just normal pot water in Norway) in and out at the top and the wort in and out the bottom. Simple. Cools 23L of wort from boiling to about 25deg in about 5 mins!

This is the internals plumbing in the boil kettle. Angled return valve to prevent oxidation of the hot wort as well as create a whirlpool to prevent the hot and cold break from being collected by the side pick up tube at the.bottom.

Here is an internal of the mash tank. False bottom in the ...errr bottom with copper pick up tube. This creates a cavity of fluid underneath the mash/grains which prevents them from being pumped/drained out and allows me to recirculate easily whilst direct firing the MLT.

Here is a pic of the fittings in the walls of the keggles. I was planning on welding these in ... but wasn't confident that I could do a job which would look ok. I was sure I could get a seal, but it might look a little rubbish. So I decided to silver solder these in. I created a flaring tool (using a sacrificial coupler and a bench grinder) and made up the device with some threaded rod and nuts and washers. Pulled the flaring tool through the hole I drilled with a step bit, then pulled a new coupler through. Used some brilliant stay-brite silver solder and liquid flux and then a propane torch to heat the coupler from the outside to melt a ring of solder on the inside. It worked perfectly and is extremely solid. Very happy with how it looks as well.

This is a picot the sight glass. Basically a stainless 90degree elbow compression fitting with some 3/8in OD polycarbonate tubing. Then the painful task of calibrating it liter by liter! Looks good and is very useful.

I hid the electrics in the bottom tubing of the frame and then distributed the wires out to the pumps and the solenoids. It keeps things nice and neat.
This is another pic of the gas beam with the 2 gas pilot safety systems and solenoids. The boil kettle has only a ball valve as it runs full time when it is being used.
I also bought a very good malt grinder. It is called a crankandstein and has 2inch diamond knurled rollers on it. It is a bare bones grinder so I needed to build a hopper and base for it. Made some uprghts for the sides out of some ply and bent some sheet metal to encase it all in. I then connect my drill to the half inch drive shaft and then grind away. Easy peasy!

Inside the hopper. I still need to finish this off and secure the hopper sides to the timber uprights ... but I was in a rush to get it ready the day before my birthday.

And upside down. This fits over my big 30L bucket which allows me to grind straight into the container which I can then pour into the mash run during "dough-in" (I love that brewing term).

The diamond knurled rollers. One is the drive shaft and the other is free rolling. I can adjust the gap as needed to ensure I get the correct grind without destroying the essential grain husks which act to filter the mash.

Here is some of my grains. Local suppliers make this a bit handy. Good quality grain from major suppliers as well!

So I have brewed my first all grain brew on this which was an All Amarillo American Pale Ale. I had some initial teething problems which I had feared had caused some issues, but I kegged and bottled this today and it tastes pretty good (even warm and flat) so am looking forward to the fist tapping in a few days! The issues I had were (a) grains clogging the pick up tube in the MLT (my pick up tube was too close to the bottom of the MLT) and (b) not able to control temperature of the mash as a result which I feared had caused some issues with the conversion of the sugars, and (c) the boil taking forever to get to temperature (my burners were far too low) which meant I had to shorten the boil and didn't get the evaporation I was hoping for. I didn't have the perfect time to take accurate gravity samples either so I was a bit unsure of my mash efficiency and resulting wort. I have been busy implementing a few changes which will hopefully eliminate these hiccups so the next brew will hopefully be smooth sailing.

Anyway, it has been great fun so far building The Øl Rig and now that I get to use it makes it very satisfying. Quality beer is one thing, but making quality beer yourself from scratch is a skill that I am loving learning.

Thanks to my darling wife for her patience with allowing me to build this and my darling daughter for sleeping through the grinding, welding, cutting, drilling, etc!

Cheers!

Saturday, November 19, 2011

Brew system continues ...

Some progress has been made this week on my brew system. I have been doing a lot of extra research much to Emma's annoyance (welding methods and systems, welding gas types, where to get gas, welding wire selection, ways to flare a coupler into the keg, distance of burners from keggles, etc etc etc). It is really fascinating how much information is out there and how complicated you could make it if you wanted! I think the important thing I need to remember is that I am not building a space station so I need to come up with realistic yet robust systems for the brew setup. Saying that however, I have decided to improve on a number of features that other systems have out there and effectively take the best from the rest! But doing it in a reasonably straightforward way!

Anyway the main progress this weekend has been the cutting of all of the framework stainless steel. I hired a big metal saw from "the neighbour" (Naboen.no) which is a really cool rental place which has heaps of cool manly tools! I picked it up on Friday arvo and today got all of the cutting done. It was a very cool tool and managed to slice through the stainless like butter without imparting too much heat into it (which can ruin some of the stainless qualities). One of the improvements over other systems has been to mitre the top corners. This will give me a nice smooth top surface for the kegs to sit on, and it looks cool also. I also cut all of the legs, the support beams, and the second shelf frame work which includes the gas beam. I haven't started to weld it up yet but most of the hard work is done and the metal saw gave some really nice clean cuts as well (which should help a lot with good joint fit up during the welding process). I also cut some scrap sections where I can practice my welding on before hitting the frame itself.

One other improvement over some systems will be the ability to change my burner height. From what I have been reading there are many different opinions regarding how far away the burner tips should be away from the bottom of the kegs. So I have included a shelf system for the burners which will allow them to be adjusted reasonably easily (I.e. no welding required to change height).

The other good stuff that arrived this week was the two Honeywell pilot lights (I only need these on the automated burners under the HLT and MLT (the boil kettle is best to be manually controlled to maintain a rolling boil). I will install these into the adjustable shelf for the burners when I get the burners. I also received my neat little temperature controller (STC 1000). This allows me to set the target temperature of the HLT or MLT and then the STC 1000 sensor will measure the actual temp and if this is lower than target it will then open the solenoid valve to the burner and presto - the heat will go up.

The hired metal saw from Naboen

Some of the legs and horizontal supports

How the top of the brew system will look with the nice mitred corners

The front section and how it roughly goes together (if you have a good 3D imagination)

Some rough preliminary thoughts on how to mount the control panel

Will need some plate I can attach the electrical enclosure onto (food for thought)

These will form the basis for the adjustable height burners

Quick 3D autocad sketchup for confirming all the lengths for the cuts today

The pilot burners

The fancy digital temperature controller and sensor (I need 2 of these to control both HLT and MLT temps)

Sunday, November 13, 2011

The Brutus Stomach is Born!

Norwegian Fathers day today! Thank you to my darling daughter for bringing me a coffee in bed along with some freshly cooked ANZAC cookies! Yum. I was also surprised with a beautiful set of paintings that Cami had done for me.
Thanks to my amazing wifey for helping Cami with all of this. I am a very lucky daddy!

Cami's artwork for her Daddy!

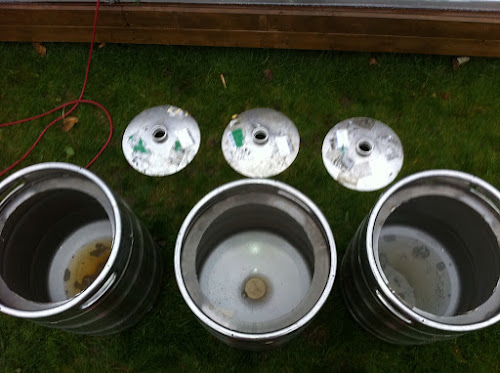
Cami also spoiled me by having a long sleep in the afternoon which allowed me to work on Brutus. Today I made a jig for my grinder that allowed me to make near perfect circular holes in the top of my kegs for the keggles. So today I cut the 3 lids off the kegs and then got a flap disc onto the edges for a nice and safe and neat finish. I plan to weld a handle into the 3 lids and will probably flatten and bend the pick-up tubes from the original kegs and make a nice stainless handle for the lids. I will also need to weld off the opening from the old keg valves. So this is the stomach of Brutus where the wort will be created from pure Norwegian water and crushed malted barley.

The jig for the grinder to make a perfect circle - grinders are as scary as chainsaws!

Close up of the jig - I was still a little nervous using this but it all worked out OK.

First lid cut off - the cutting disc caught in a few spots and gave a few rough edges, but all in all pretty good.

With what will be the lid of the keggle.

The pick-up tubes I will modify and use as a handle for the lids.

The second keg I did was the most perfect - must have got impatient by the third!

All 3 keg lids cut off - just need some buffing up with the flap-disc.


And this is the stainless square section that will form the skeleton of Brutus - next weekends task!


Happy Father's Day to all the lucky Dad's in Norway today!

Saturday, November 12, 2011

The Brutus Brain and Skeleton is being pieced together!

I received some goodies in the post yesterday. For those of you interested I received a White-Rodgers 764-742 Gas Pilot Safety Valve (thermocouple operated). This will form part of the brain of the brew system and will provide a good safety system. As the burner system will be automated and will automatically fire the burners when there is a drop in either hot liquor tank (HLT) temperature or also for a drop in the Mash & Lautering Tun (MLT) temperature then I need to make sure that when doing this outside (also for safety reasons with the LP gas) that if the pilot light blows out it will shut off the gas supply to the burners. Therefore I have also ordered some good pilot burners (Honeywell Q314A) and a thermocouple to go with the gas pilot safety valves. These will arrive in the next week or so.

Here is a picture of the gas pilot safety valve.

I have also today gone and picked up some other important parts. The first one is a bunch of fittings for the brewing liquid system. I plan on welding (using a new MIG system) the 1/2" pipe couplers onto the side of the keggles (the BK, MLT and HLT) which will allow me to add various fittings and parts to my keg. The main fitting will be the drain which will include the ball valves. On the MLT I will also include a Tee piece which will allow me to fit a thermowell inline into the system so that I can plug in my thermosensor in-line and have accurate measurement of the wort as it is being recirculated through the RIMS system. This thermosensor will feedback info to the temperature controller and fire the burner under the MLT if the temperature drops below the necessary mashing or sparging temperatures. Easy-peasy!

Anyway here are my stainless fittings (316 stainless no-less!!) which I picked up from Maritim.no down here in Stavanger. Got a very good price on them too!

Here is how the Tee system will be setup with the pipe couple on the end welded onto the keg for the MLT. On the other end at the tee will be a 1/2" thermowell which will measure the mashing temps "in-line". I will then drain or re-circulate from the bottom of the Tee back into the MLT or when I am sparging straight into the BK.

The other thing I picked up today was the skeleton of the system! This is some lovely polished 304 stainless steel which will be cut next weekend (using a hired steel cutting saw). I plan on mitering the top corners for the frame so that it is a nice and flush surface for the kegs to sit on. The rest will be plain square ends. I haven't decided whether to include a gas beam into the system yet or whether I will just have it plumbed externally and secure the plumbing to the frame. I'm leaning towards a gas beam but haven't yet concluded on the final set up for the gas system. So the steel you see on my car roof is 18m of 304 stainless box section (50 x 50 x 3mm) as well as some flat bar which will be used to create an adjustable burner shelf so i can adjust the flame height/position once I see where it fits best. All exciting stuff I can tell you!

My lovely 304 stainless!

I have also decided on what MIG system I will get. It ain't cheap but it's a he'll of a lot cheaper than any other decent MIG system and will provide sufficient power to weld the 3mm wall of the frame. I'll include an argon gas shielding system and for the couplers on the kegs I will have a system to purge the back of the weld with argon to ensure no rusting as a result of the welding process. I'll show my lovely welder when I get it. If they have it in stock next week I may end up being able to perform all my cuts of the steel and start with some trial welding! My lovely steel supplier also threw in a stainless wire brush for polishing the welds after MIG-ing. Champ!

Beer on!

Thursday, November 10, 2011

It's Happening!

More planning for the ultimate brewery!

More parts are arriving tomorrow! YAY!

Thursday, November 03, 2011

Brutus is Born!

Ok, for those non-drinkers out there (a) you will have to be patient over the next couple of months and (b) I don't really like you anyway. I have officially started a project which will consume a lot of my time, thoughts, dreams, energy and money and I hope will give me great satisfaction over the coming years.

The project is to build a sem-automated, all-grain, stainless steel, gas-fired, safety-controlled, RIMS (look it up - highly interesting for beer geeks) brewing system. I have been spending an inordinate amount of time (much to Emma's annoyance) researching how I should go about this. There are quite a lot of different set ups that many fellow beer geeks have made over the years (why are a lot of home brewers engineers?) but one in particular which has been copied, modified and built on over the years is Lonnie Macs Brutus 10 system. I have been researching this system quite a lot, I bought his plans you can buy from Brew Your Own magazine and from reading forums (mostly Aussie Home Brewer and Home Brew Forum).

I have decided to create a system using the best of a number of systems. My main criteria for this system are to have it as stainless steel system where possible, capable of doing 2 batches at once (38L), an automatic temperature controlled system for the HLT and the MLT through use of digital temperature controllers and thermistors through thermowells, pilot lights for the automated gas burners with auto shutoff valves if pilots go out, plate chiller, robust magnetic drive food grade pumps for recirculation for the RIMS as well as for transferring between HLT to MLT to Boiling kettle as well as for the plate chiller for the cold break (more beer geek talk), and a sexy control box/panel/system!

So anyway, the project has started in earnest. I have been in contact with the brewmaster from the Stavanger brewery (Lervig Aktiebryggeri) who gave me some kind pointers as well as offering some kegs for free (unfortunately they were only 30L kegs in Stainless and 50L in aliminium), as well as the main boutique beer pub in town (Cardinal), but I finally got in touch with Ola Vaaland from Bryne ølutsalg (any beer lovers in Stavanger should go there - very impressive - even managed to find a slab of VB there!!!) and Ola found 3 stainless steel 50L kegs for me and put them aside for me. I am planning on converting these into the keggles (keg turned into kettles) which will form the basis for my starting HLT, MLT and boil kettle. I will likely invest in a 70L boil kettle down the track but at least this is a start point. Oh yeah, one of the kegs is about 1/3 full of Tou beer ... It's going straight down the drain!

Kegs picked up tonight waiting conversion to keggles

VB slab ... in Bryne?!?!

I have also been ordering lots of parts for my gas setup. 2x gas pilot safety valves, 2x thermocouples for the valves, 2x solenoid gas valves for automatic control of the gas to the burners, and a few fittings and things.

I plan on getting my stainless steel square hollow section from a fabricator I know through work. Other stuff I will get locally and may even manage to sneak some pumps and Mongolian jet burners in my luggage when coming back from Oz in January!

Anyway, I want to try and document my build as much as possible so will blog regularly about it. Any comments are obviously welcome and I am sure that Cami will have some special apprentice cameo's during the build as well. For now however, it is just getting a few of the bits and pieces together and when it comes to the build I will post a lot more. I will probably start most of the build after I get back from oz in Jan.

Pic of Cami to show I haven't gone completely brewing mad!

Wish me luck!!